User Guide
This guide walks you through everything you need to know to use KitaManager day to day. It is written for daycare directors (Kita-Leitungen), educators (Erzieher/innen), and parent board members (Elterninitiative). No technical knowledge is required.
Logging In
- Open your browser and go to the KitaManager address your administrator gave you.
- Enter your email address and password.
- Click Login.
You will land on the dashboard, which gives you an overview of your organization.
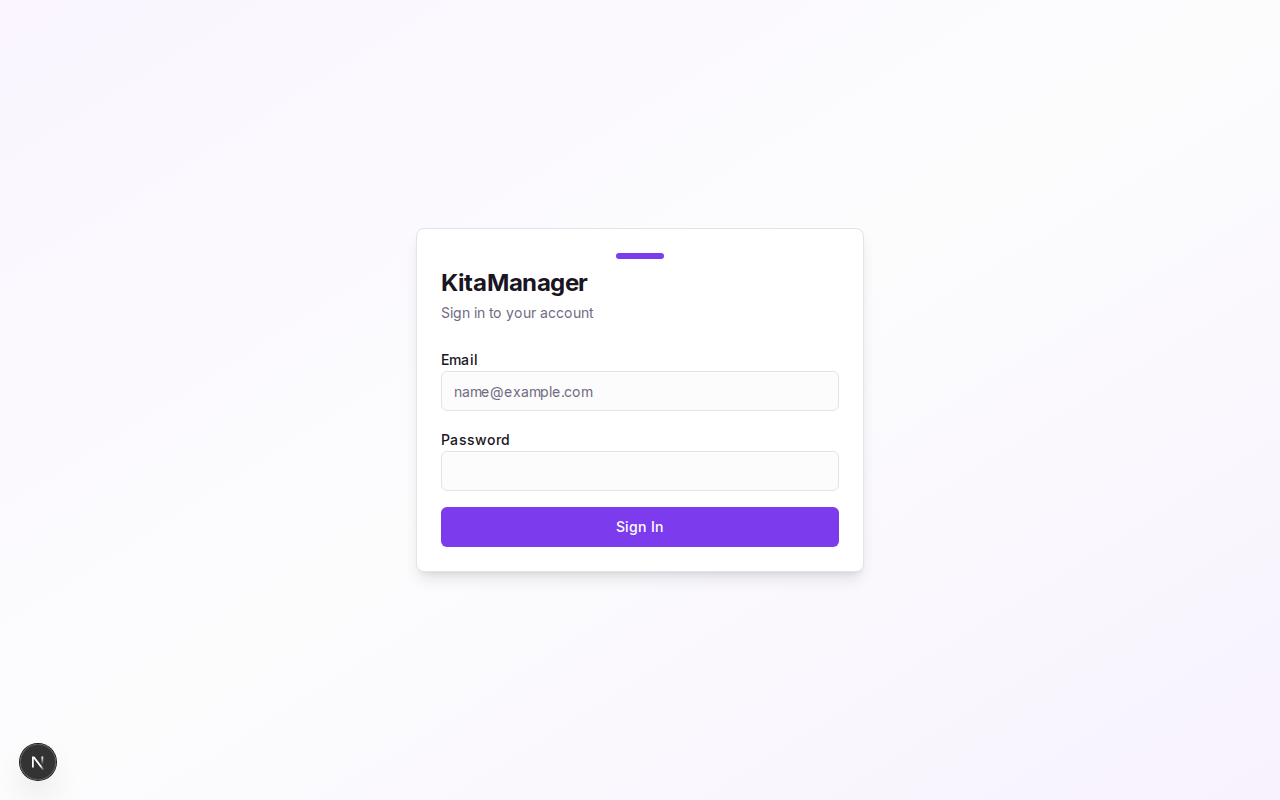
The KitaManager login page.
If you have forgotten your password, contact your administrator. They can reset it for you.
Finding Your Way Around
KitaManager is designed to work on desktop computers, tablets, and phones. Here are the main navigation elements:
- Sidebar – The menu on the left side of the screen. It contains links to all areas: Employees, Children, Sections, Statistics, Budget, and more. On a phone or tablet, tap the menu icon to open it.
- Organization selector – In the sidebar. If you manage more than one location, switch between them here. Everything you see and do applies to the currently selected organization.
- Breadcrumbs – The small path shown at the top of each page (for example, Children > Max Mustermann > Contracts). Click any part to jump back to that level.
- Dark mode toggle – In the top bar. Switch between a light and dark color theme, whichever is easier on your eyes.
- Language switcher – Also in the top bar. Switch the interface between English and German (EN/DE).
The Dashboard
The dashboard is the first thing you see after logging in. It gives you a quick health check of your organization:
- Stat cards at the top show key numbers at a glance – total children, employees, sections, and more.
- Alerts draw your attention to things that need action:
- Children without a valid voucher (Gutschein)
- Mismatches between contracts and section assignments
- Children approaching or exceeding section age limits
- Employees eligible for a step promotion (Stufenaufstieg)
- Children with upcoming start dates
Think of the dashboard as your daily to-do list. Check it each morning to see if anything needs your attention.
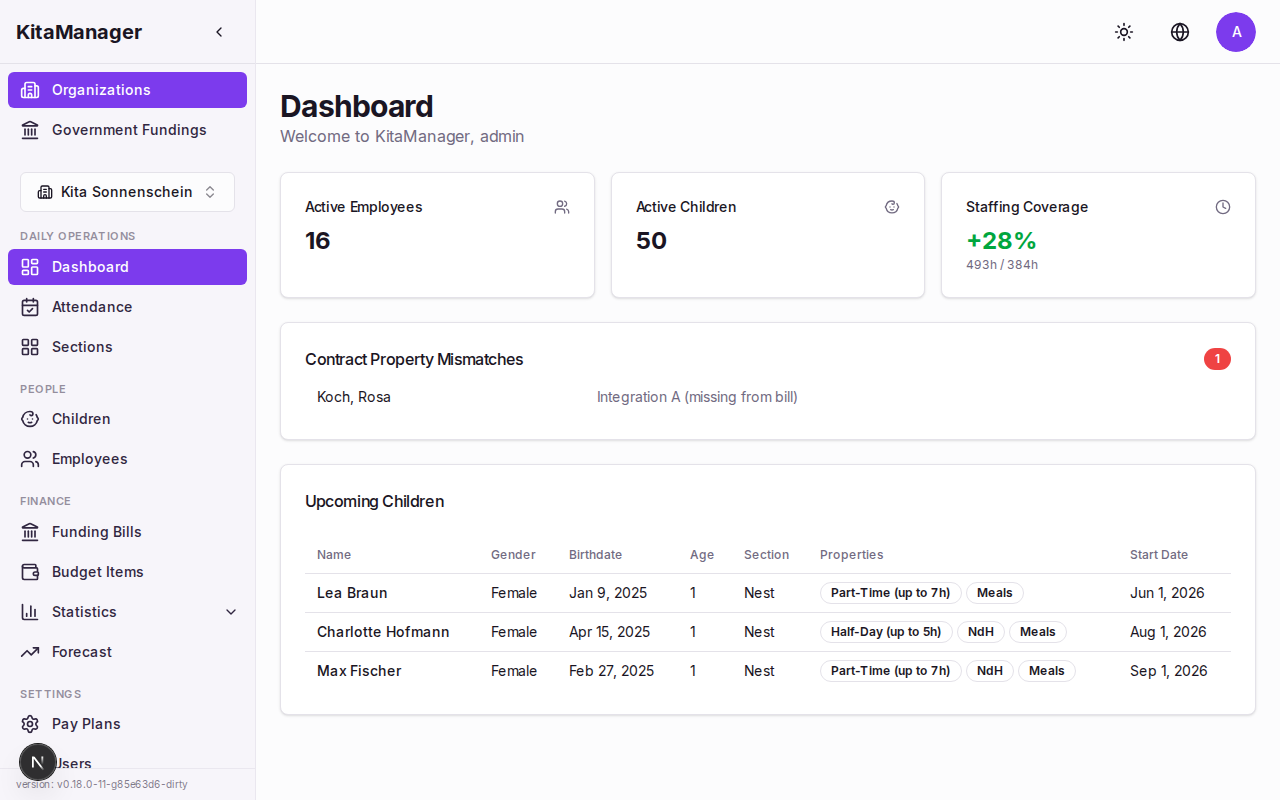
The dashboard provides an overview of your organization with stat cards and alerts.
Daily Operations
Tracking Attendance
Attendance tracking helps you keep a record of which children are present each day. This is important both for safety (knowing who is in the building) and for reporting.
- Click Attendance in the sidebar.
- You will see a weekly grid with all children who have active care contracts.
- For each child, mark them as present or absent for each day of the week.
- Your changes are saved automatically – there is no extra save button.
The attendance page also shows an organization-wide summary for the selected week, so you can see at a glance how many children were present each day.
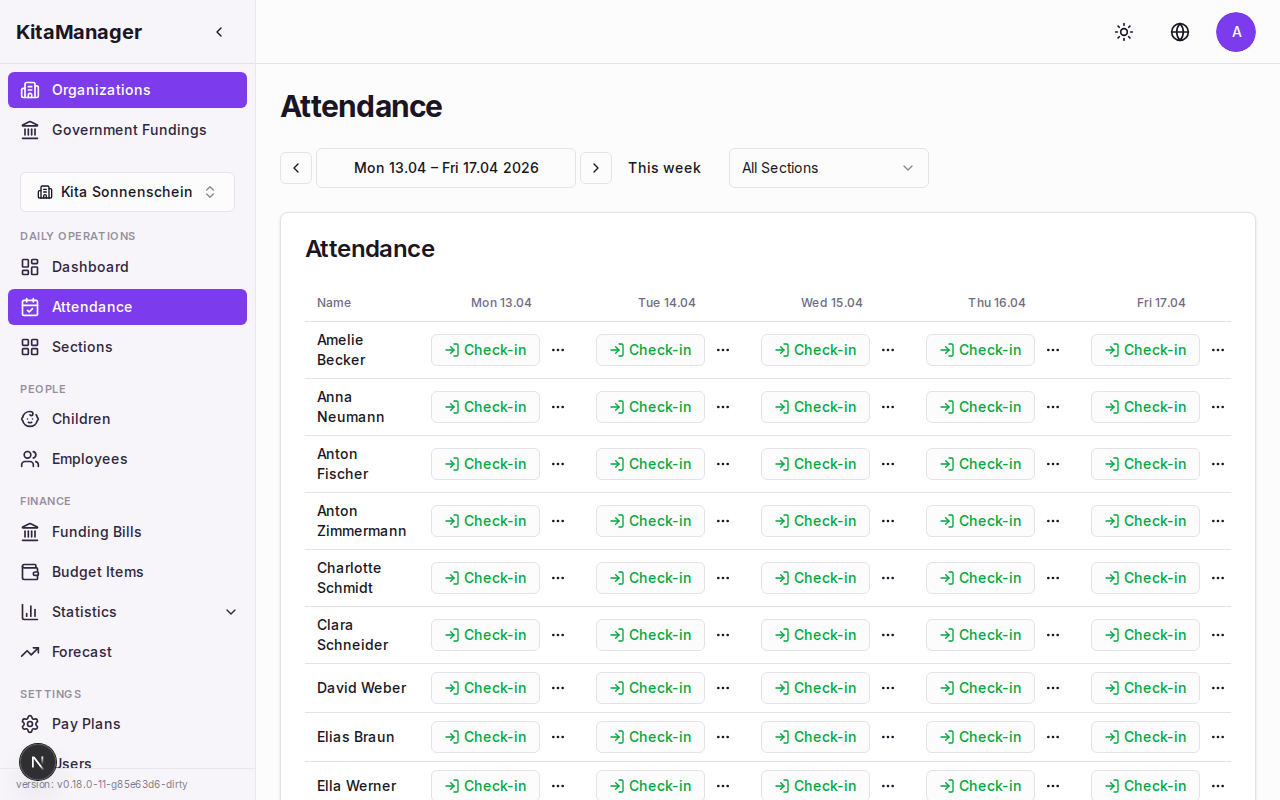
The weekly attendance grid. Mark each child as present or absent for each day.
Managing Sections
Sections represent the groups within your daycare. Typical examples are age-based groups like Nest (infants), Nestfluchter (toddlers transitioning out of the infant group), and Grosse (older children). Sections matter because they determine staffing ratios and are used in funding calculations.
- Click Sections in the sidebar.
- You will see all sections in your organization.
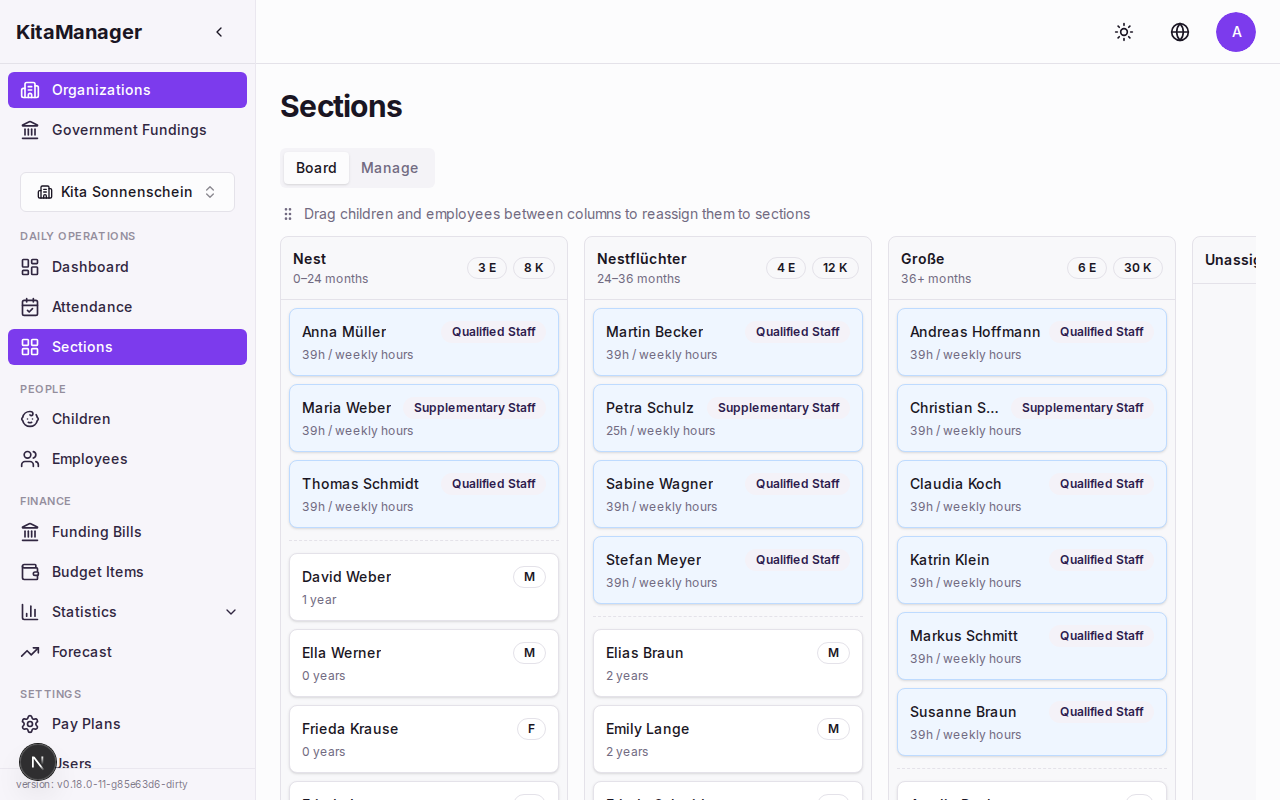
The sections page showing all groups in your organization.
Creating a Section
- Navigate to Sections.
- Click Create.
- Enter the section name.
- Click Save.
Editing or Deleting a Section
- Click on the section you want to change.
- Update the fields and click Save, or click Delete to remove the section.
Moving Children Between Sections
You can drag and drop children from one section to another directly on the sections page. This is useful when children move up to the next age group.
Managing Employees
Viewing the Employee List
- Click Employees in the sidebar.
- You will see a list of all employees with key information: salary, grade, weekly hours, and their assigned section.
This overview helps you see staffing at a glance – who works how many hours and at what pay level.
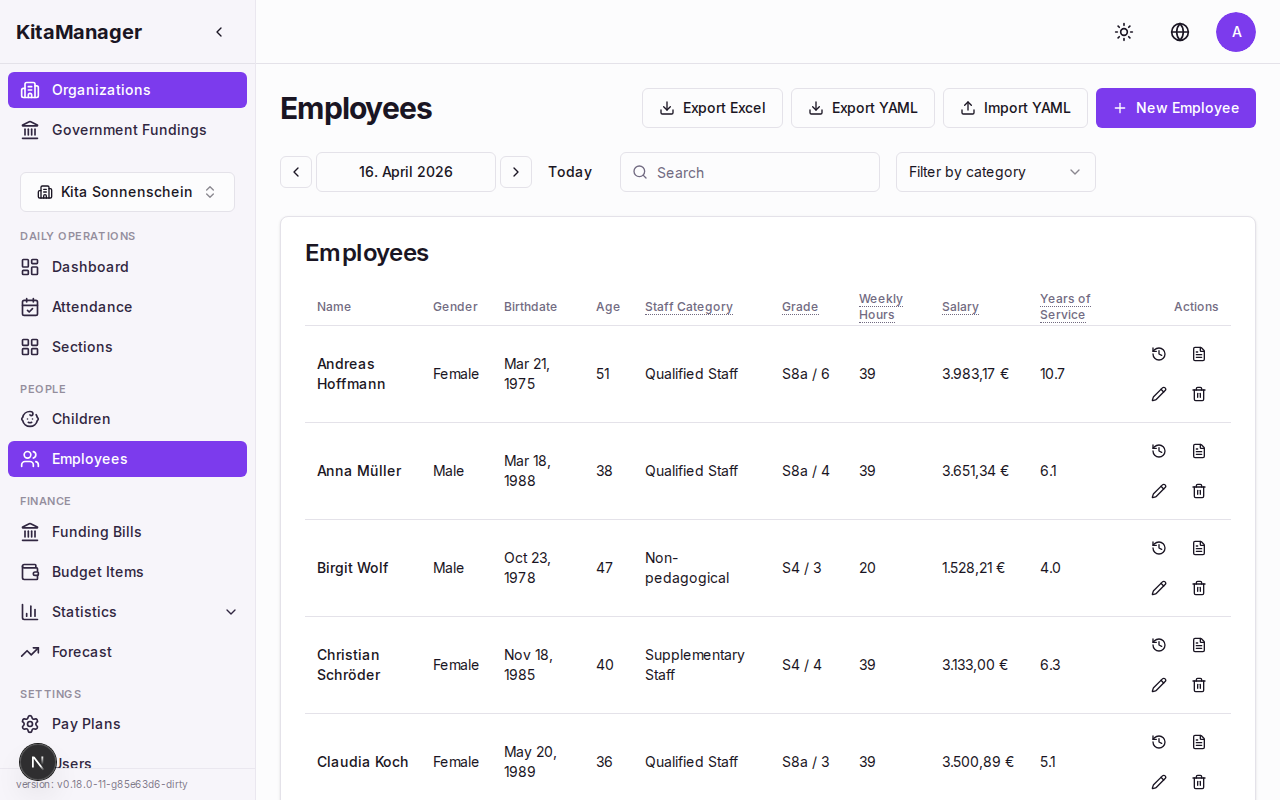
The employees page showing all staff members with their salary, grade, and weekly hours.
Creating an Employee
- Navigate to Employees.
- Click Create.
- Fill in the required fields: first name, last name, gender, and birthdate.
- Click Save.
After creating the employee, you will need to add an employment contract (see below) to define their working conditions.
Employment Contracts
Each employee needs at least one employment contract. The contract defines everything that affects their salary and working hours. Getting these details right is important because KitaManager uses them to calculate staffing levels and salary costs.
To create a contract:
- Open the employee’s detail page.
- In the contracts section, click Create Contract.
- Fill in the details:
- From – When the contract starts
- To – When the contract ends (leave empty for permanent contracts)
- Staff category (Personalkategorie) – The employee’s role category
- Grade (Entgeltgruppe) – The salary grade
- Step (Stufe) – The current step within the grade
- Weekly hours (Wochenstunden) – How many hours per week
- Pay plan (Entgelttabelle) – Which pay scale applies (e.g., TVoD-SuE)
- Section – Which group the employee is assigned to
- Click Save.

Creating a new employment contract with grade, step, and weekly hours.
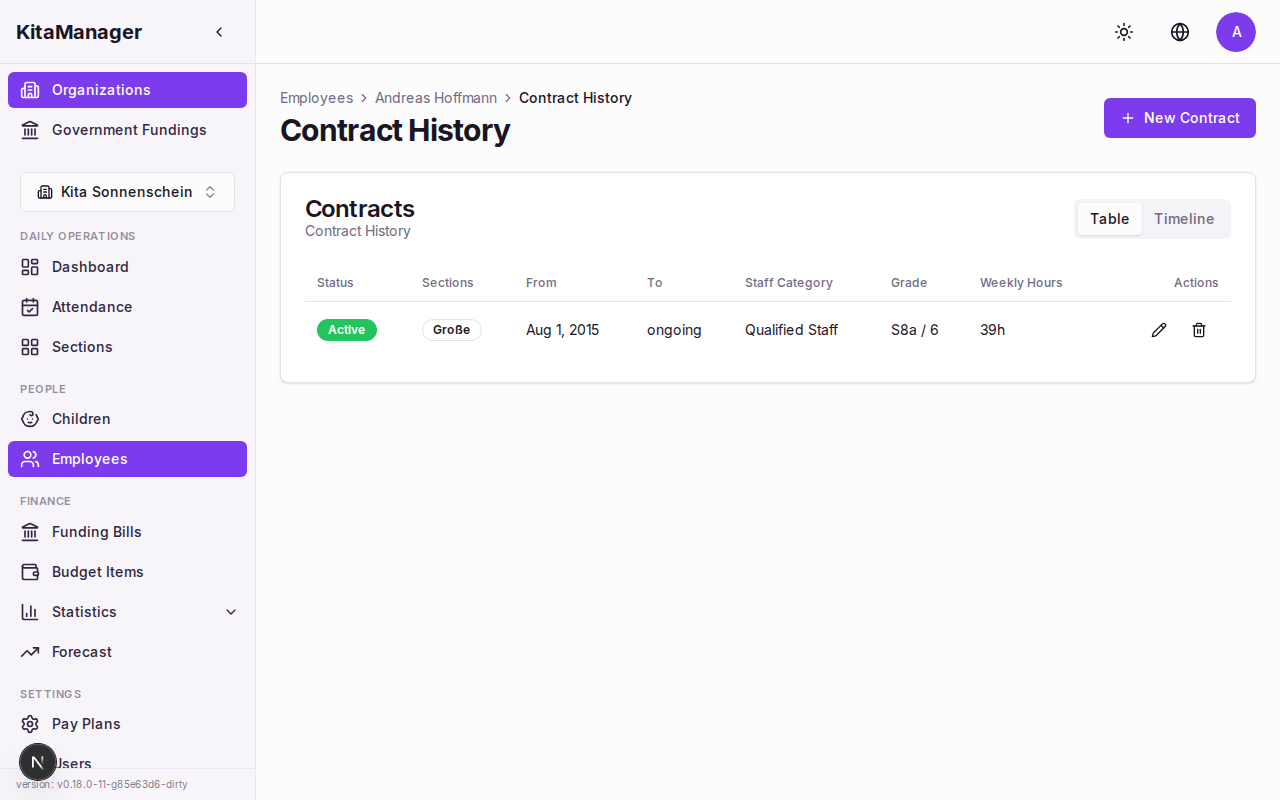
Employment contracts for a staff member, showing contract history.
Step Promotions
Employees in the TVoD-SuE pay scale are entitled to move to the next salary step after a certain time in their current step (Stufenaufstieg). KitaManager tracks this automatically.
When an employee is eligible for a step promotion, an alert appears on the dashboard. To act on it:
- Check the dashboard alerts for step promotion notifications.
- Click the alert to go to the employee.
- Create a new contract with the next step.
This ensures you do not miss salary adjustments and stay compliant with the pay plan.
Managing Children
Viewing the Children List
- Click Children in the sidebar.
- You will see all enrolled children with their funding amount, FTE requirement, and any billing differences.
The funding amount and billing difference columns are especially important – they tell you at a glance whether the calculated funding matches what you are actually receiving from the government.
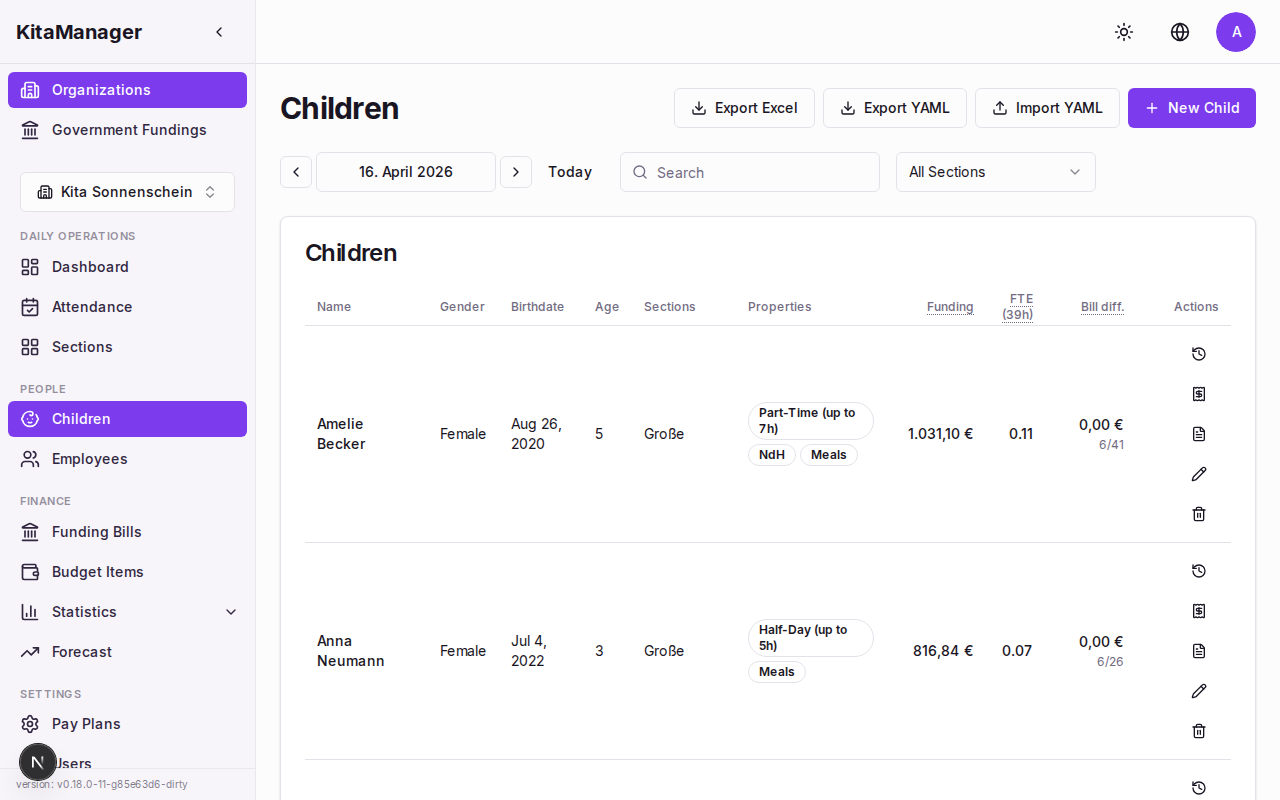
The children page showing funding amounts and billing differences for each child.
Creating a Child Record
- Navigate to Children.
- Click Create.
- Fill in the required fields: first name, last name, gender, and birthdate.
- Click Save.
After creating the child record, you will need to add a care contract (see below).
Care Contracts and Contract Properties
A care contract defines how a child is enrolled at your daycare. It is the single most important record for each child because the contract properties directly determine how much government funding (Kita-Forderung) you receive.
To create a care contract:
- Open the child’s detail page.
- In the contracts section, click Create Contract.
- Fill in the basic details:
- From – When the contract starts
- To – When the contract ends
- Voucher number (Gutscheinnummer) – The number from the government-issued voucher
- Section – Which group the child belongs to
- Set the contract properties:
- Care type (Betreuungsart) – Choose between Halbtag (half-day), Ganztag (full-day), or Teilzeit (part-time)
- Supplements (Zuschlage) – Select any that apply:
- ndH – Non-German-speaking household (nichtdeutsche Herkunftssprache)
- MSS – Extended care needs (Mehr Sprachforderung)
- Integration A – Integration support level A
- Integration B – Integration support level B
- Click Save.
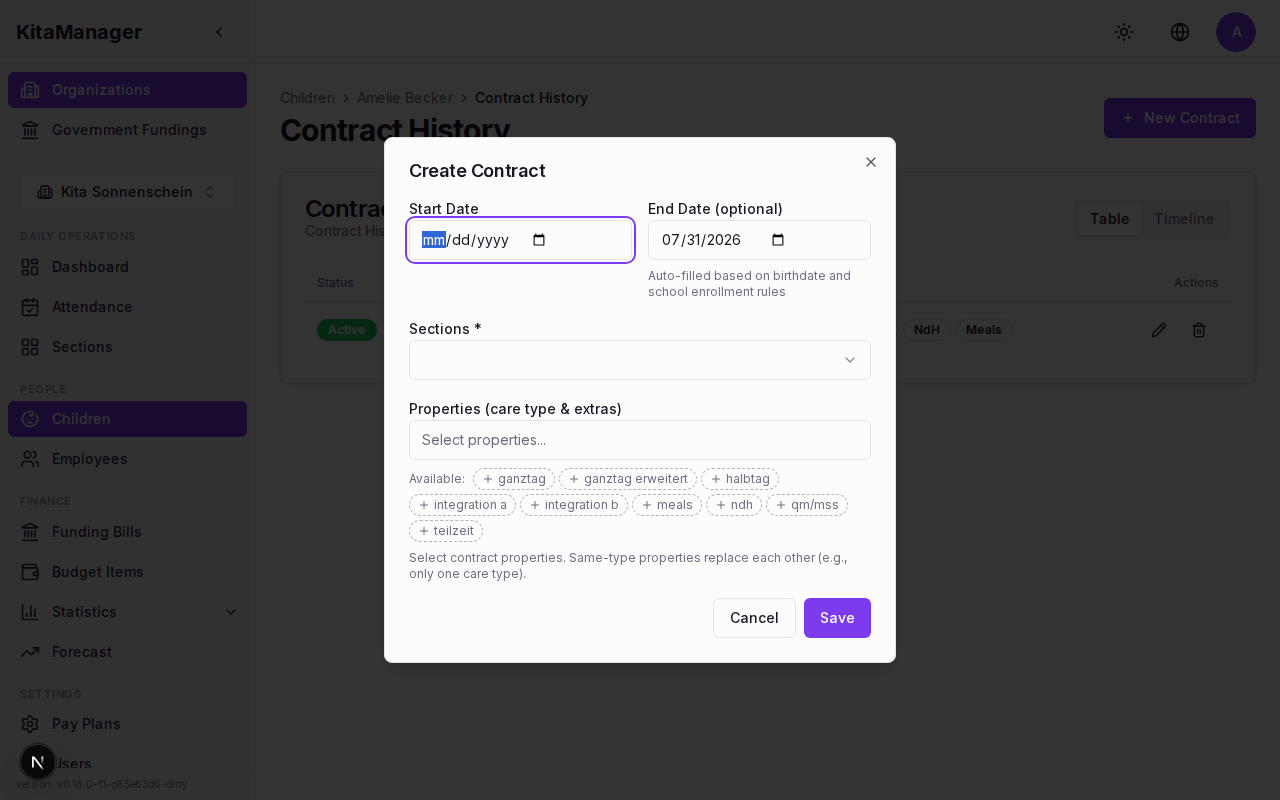
Creating a new care contract with care type and supplement settings.
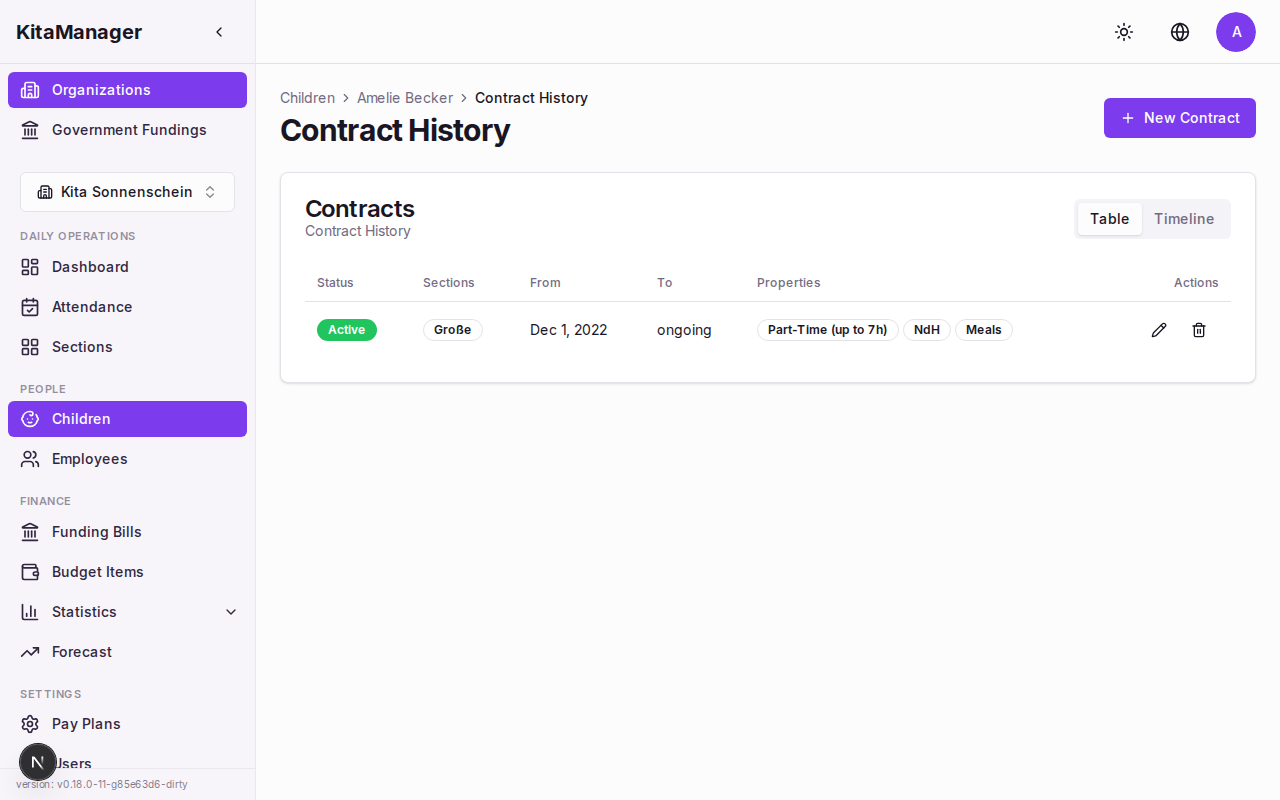
Care contracts for an enrolled child.
How Contract Properties Determine Funding
KitaManager calculates funding for each child based on the combination of:
- The child’s age (determined from their birthdate)
- The care type (Halbtag, Ganztag, or Teilzeit)
- Any supplements (ndH, MSS, Integration)
Each combination maps to a specific monthly rate defined in the government funding rates. KitaManager looks up the correct rate automatically, so you do not need to calculate anything yourself. But the result is only as accurate as the data you enter.
Understanding Your Finances
How Government Funding Works
In Berlin, daycare centers receive government funding (Kita-Forderung) based on the children enrolled and their individual care arrangements. The funding rates are set by the Senate and depend on each child’s age group, care type, and any approved supplements.
KitaManager stores these rates and uses them to calculate how much funding your organization should receive each month. This gives you an independent check against the government’s own calculations.
The Financial Overview
The financial overview page shows you the big picture of your organization’s finances:
- An income vs. expenses chart showing how your funding and other income compare to salary costs and other expenses over time.
- A cumulative balance line that shows whether you are running a surplus or deficit. Deficit periods are highlighted so you can spot financial trouble early.
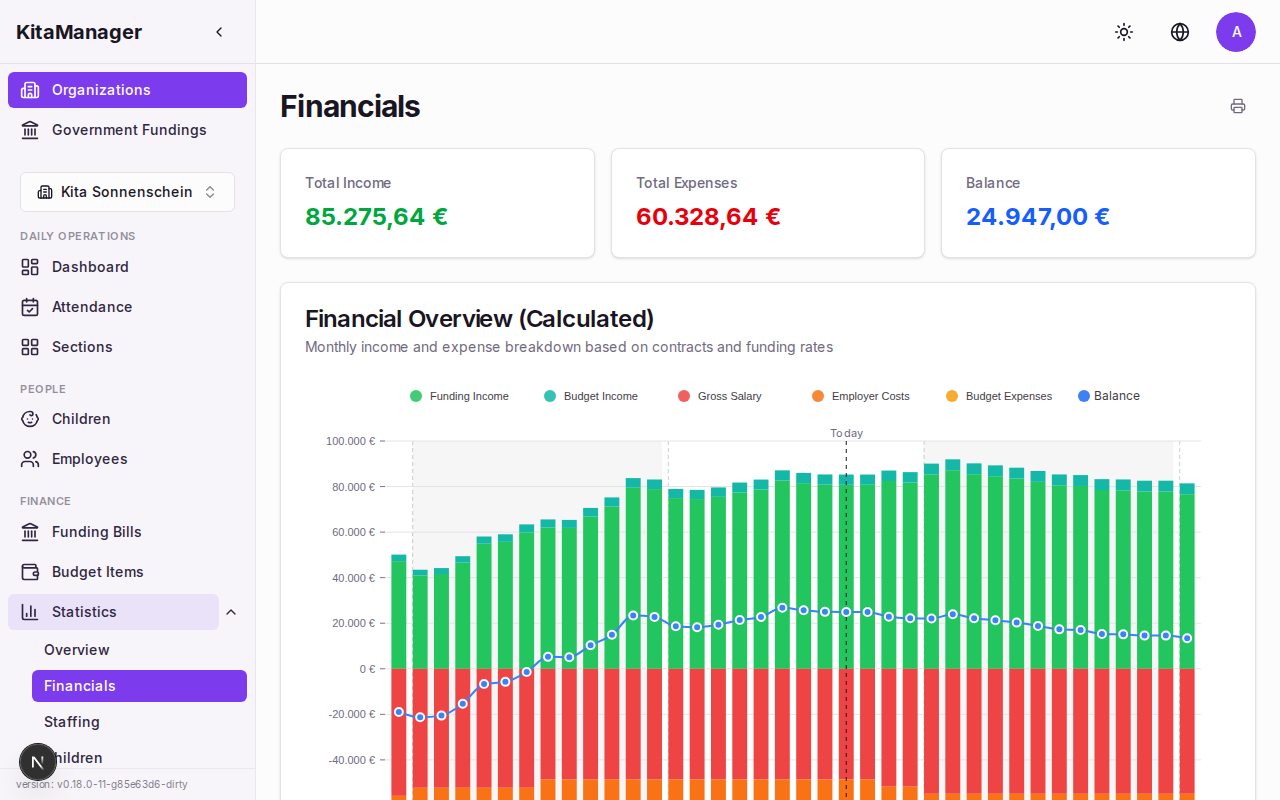
The financial overview with income, expenses, and cumulative balance.
Scroll down to see the Actual vs Calculated Funding chart, which compares what the government billed against what KitaManager calculated. Discrepancies are highlighted per Kita year.
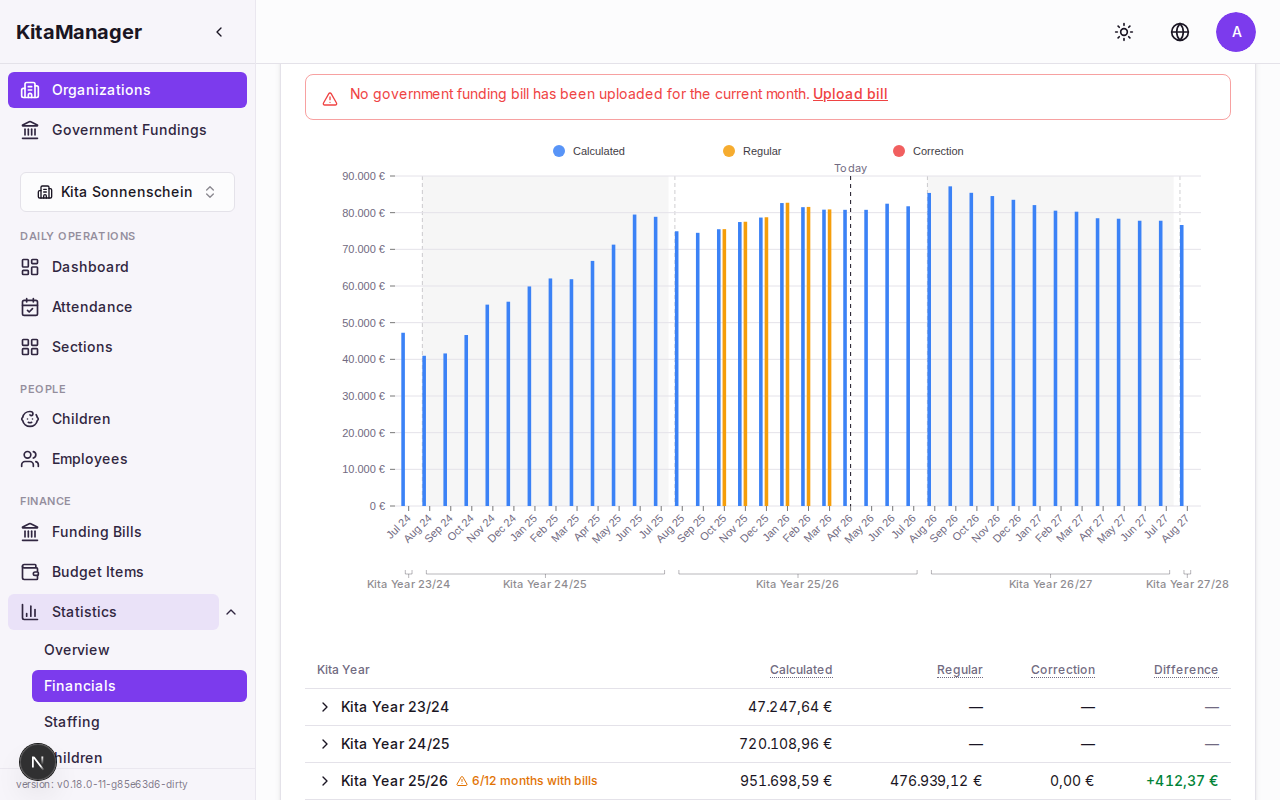
Actual government funding compared to calculated amounts, with deficit analysis.
The Cumulative Balance chart tracks your running financial balance across Kita years. Red bars indicate deficit months, and the chart marks exactly where a deficit started.
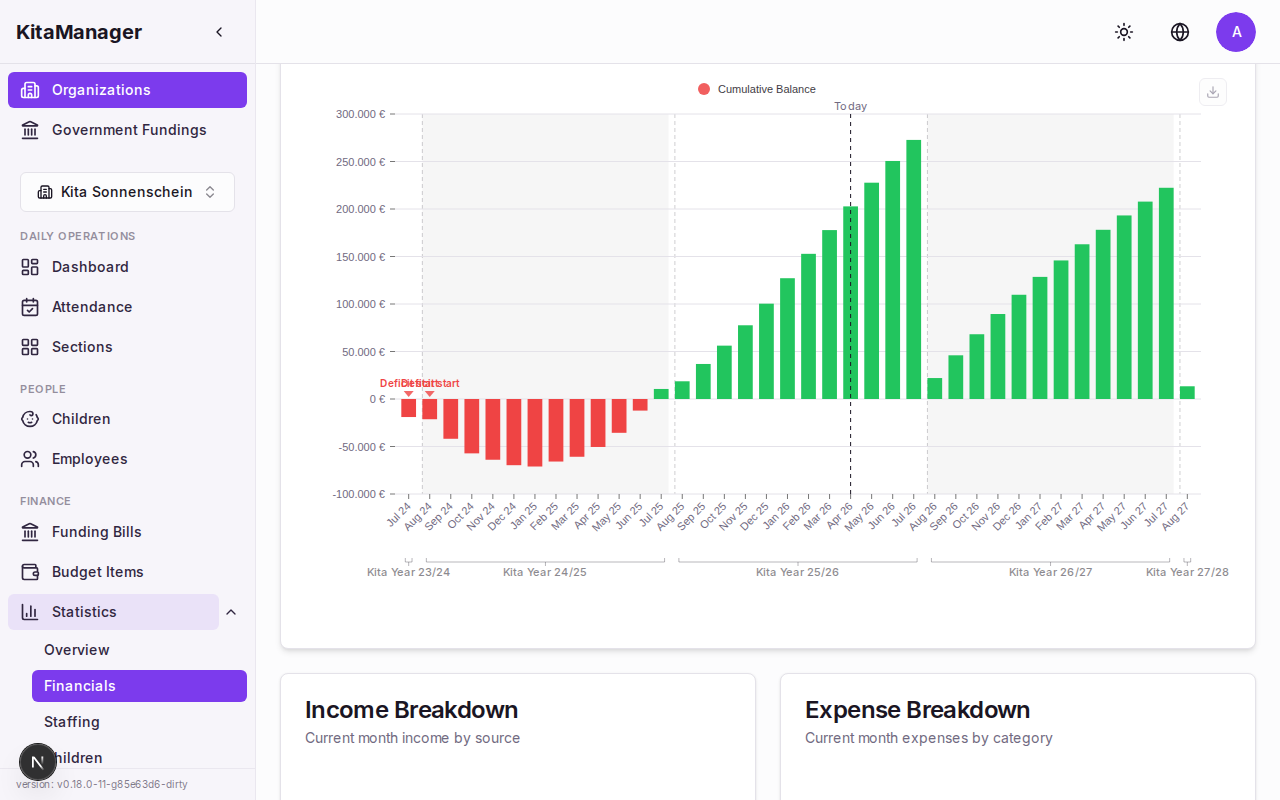
Cumulative balance with deficit markers and consecutive deficit month count.
The Budget Overview table shows monthly income and expenses in a grid, making it easy to compare months side by side.
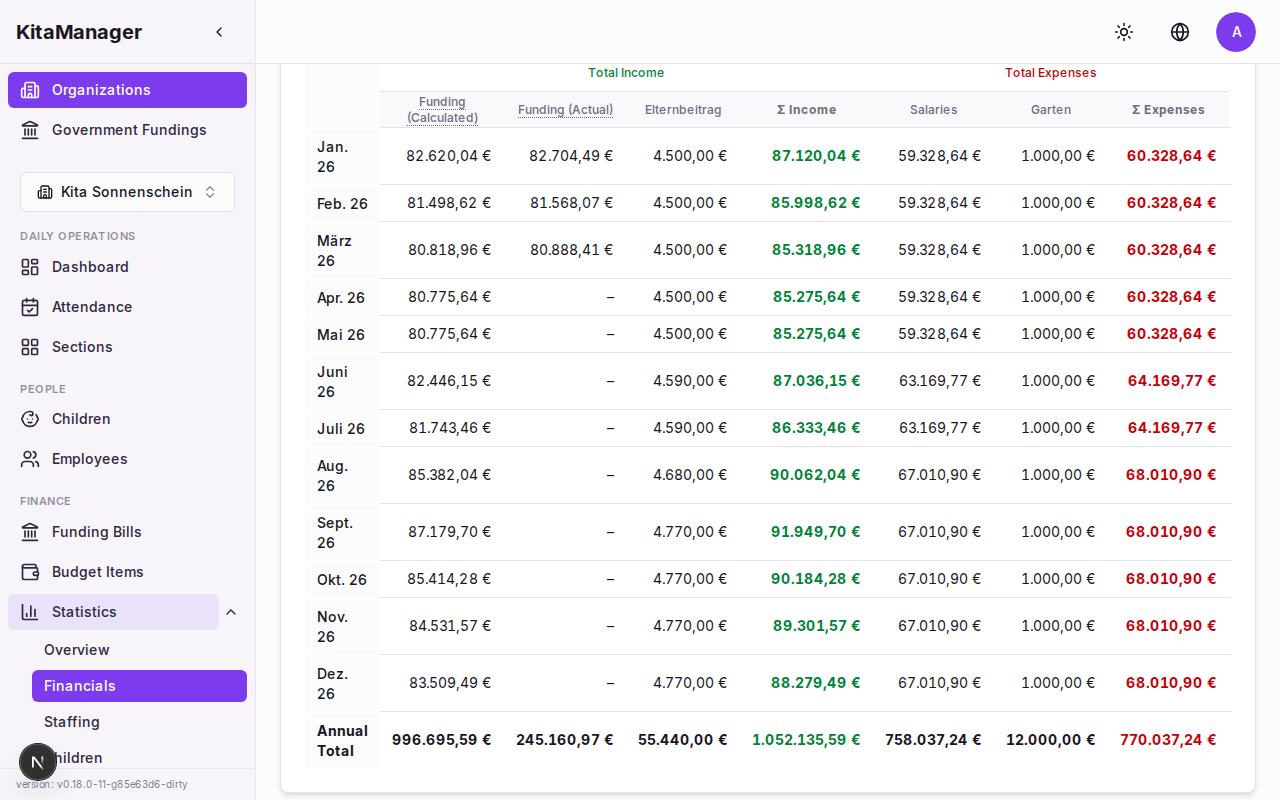
Monthly budget breakdown with income, expenses, and balance per month.
Checking Government Funding Bills
Every month, you receive a funding bill from the ISBJ (the Berlin authority responsible for Kita funding). KitaManager lets you upload these bills and compare them against its own calculations.
- Navigate to ISBJ Bills in the sidebar.
- Click Upload and select the ISBJ Excel file from your computer.
- Use the kita year navigation to switch between funding periods.
- The summary bar at the top shows you immediately how many children match, how many have differences, and the total monetary difference.
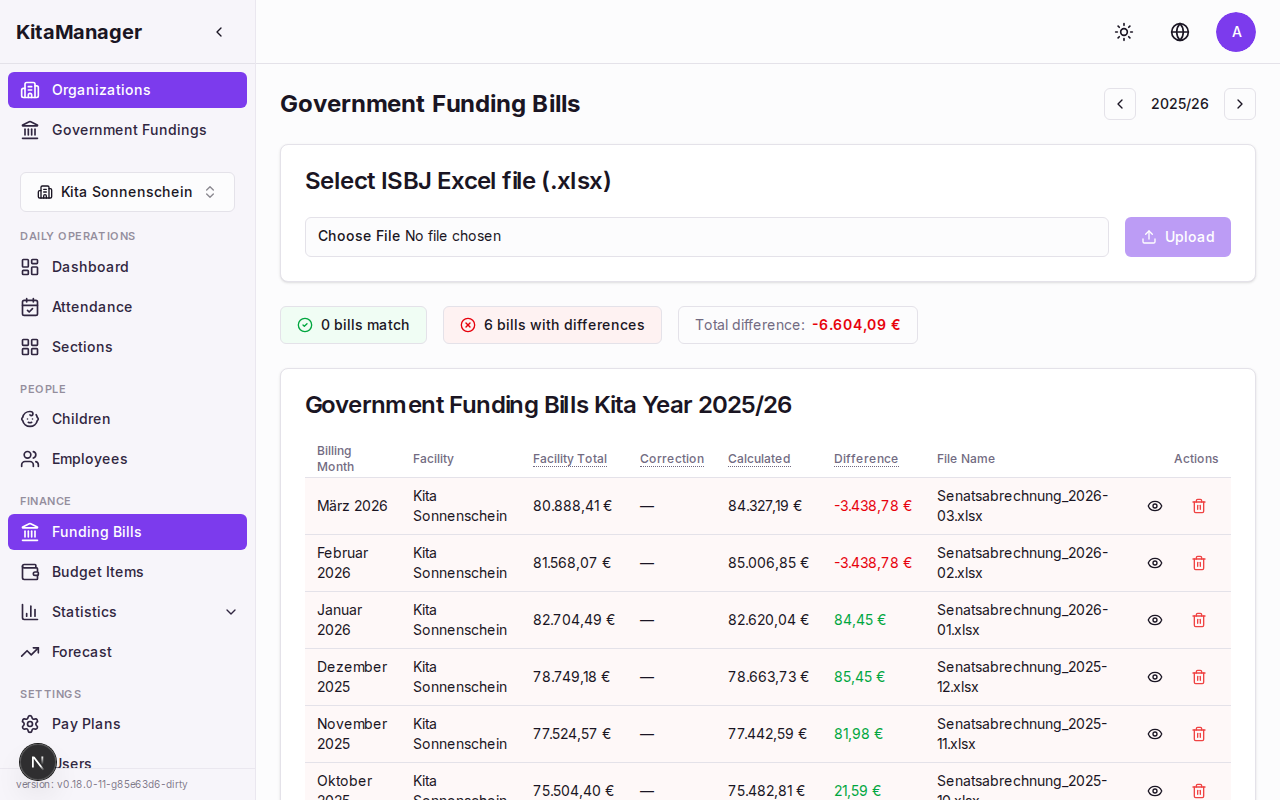
Uploaded ISBJ bills with a summary bar showing matches and differences.
Understanding Discrepancies
When the government bill does not match KitaManager’s calculation, you will see mismatch tags next to the affected children:
- Missing from bill – KitaManager expects funding for this child, but the government bill does not include them. This could mean the voucher was not submitted or processed yet.
- Extra in bill – The government bill includes a child that KitaManager does not expect. This might happen if a child left your daycare but the government has not updated their records.
- Different rates – Both sides agree the child should be funded, but the amounts differ. This usually means the contract properties in KitaManager do not match what the government has on file.
Click on a bill to see the per-child comparison with detailed amounts and status badges.
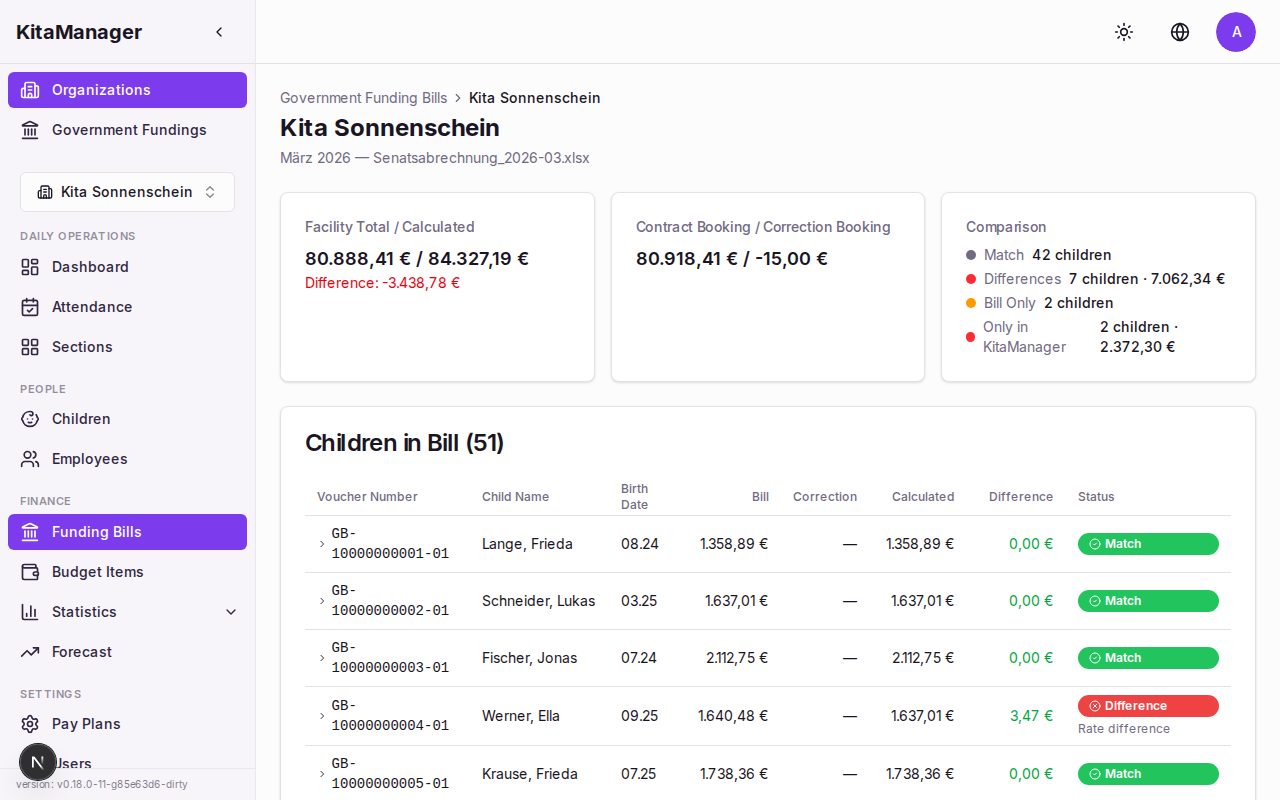
Per-child comparison showing billed vs. calculated amounts with mismatch indicators.
You can also view the complete billing history for an individual child by navigating to their detail page and clicking Billing History.
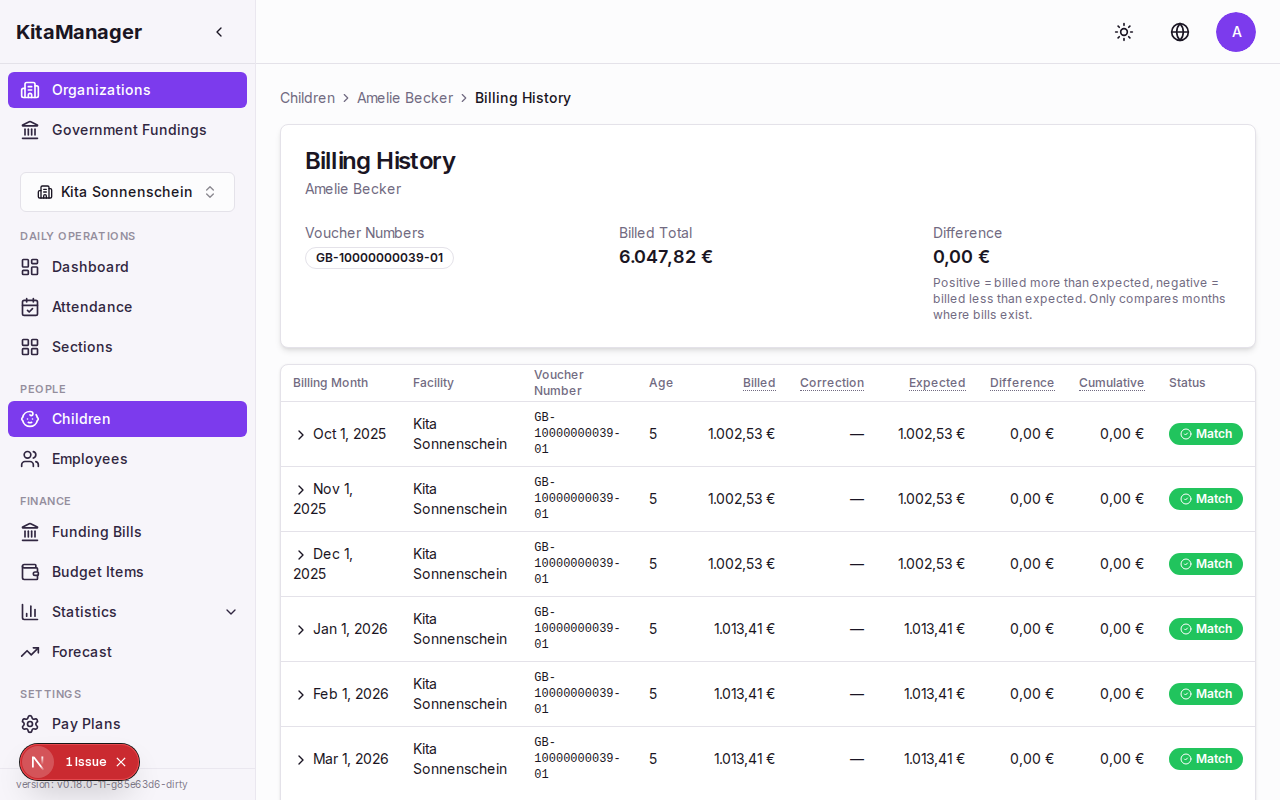
Complete billing history for a child across all uploaded bills.
Using the Forecast
The forecast page lets you look ahead and plan for the future. It shows projected income and expenses based on current contracts and lets you explore what-if scenarios.
- The target balance line shows where your finances are heading if nothing changes.
- The baseline context helps you understand whether the trend is improving or worsening compared to the current situation.
Use the forecast when making decisions like hiring a new employee or adjusting care hours – it shows you the financial impact before you commit.
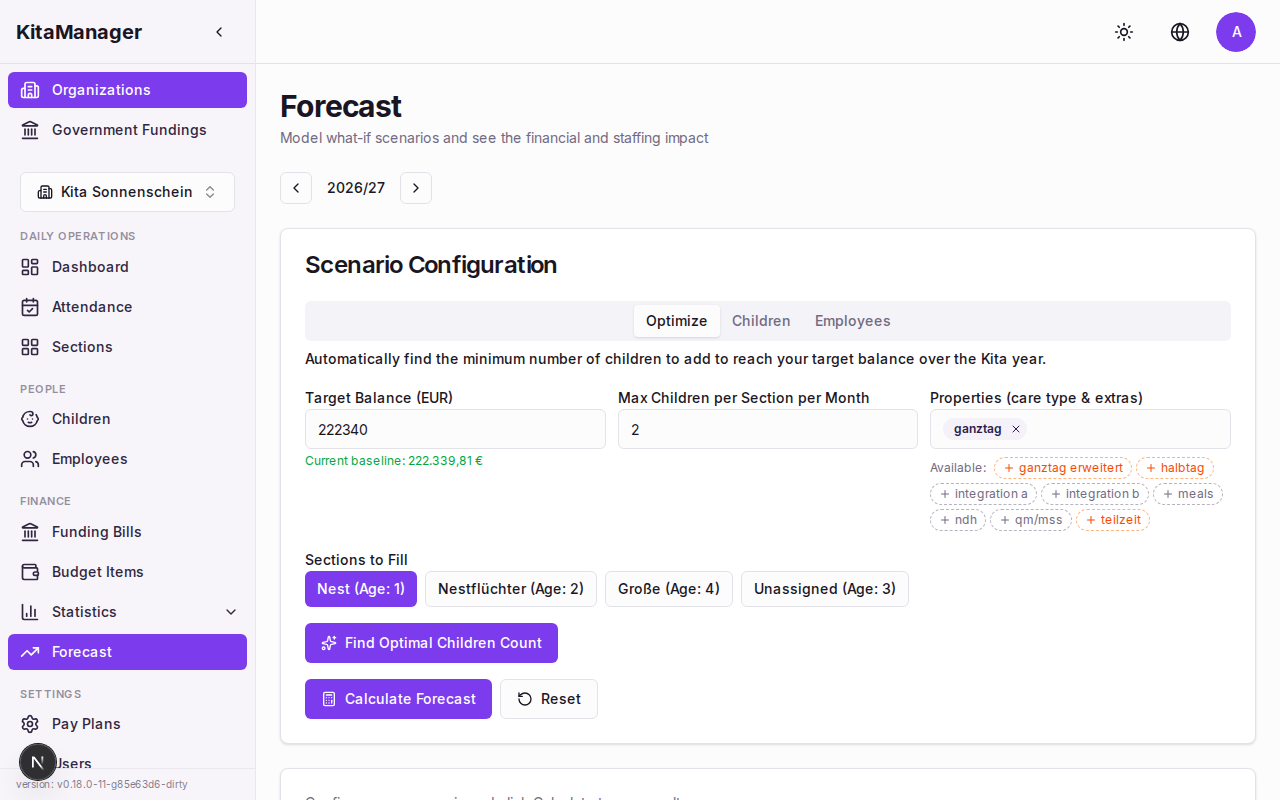
The forecast page showing projected financial trends.
Budget Planning
Budget Items
Budget items let you track income and expenses that are not automatically calculated from contracts. Examples include parent fees (Elternbeitrage), rent, garden maintenance, or office supplies.
- Click Budget in the sidebar.
- You will see all budget items for your organization, organized by income and expenses.

The budget overview showing all budget items.
Adding Budget Entries
Each budget item can have multiple entries that represent individual amounts over specific time periods.
- Click on a budget item to open its detail page.
- Click Add Entry.
- Fill in:
- From – Start date of the entry
- To – End date of the entry
- Amount – The monetary amount
- Click Save.
Budget entries feed into the financial overview and forecast, so keeping them up to date gives you a more accurate picture of your finances.
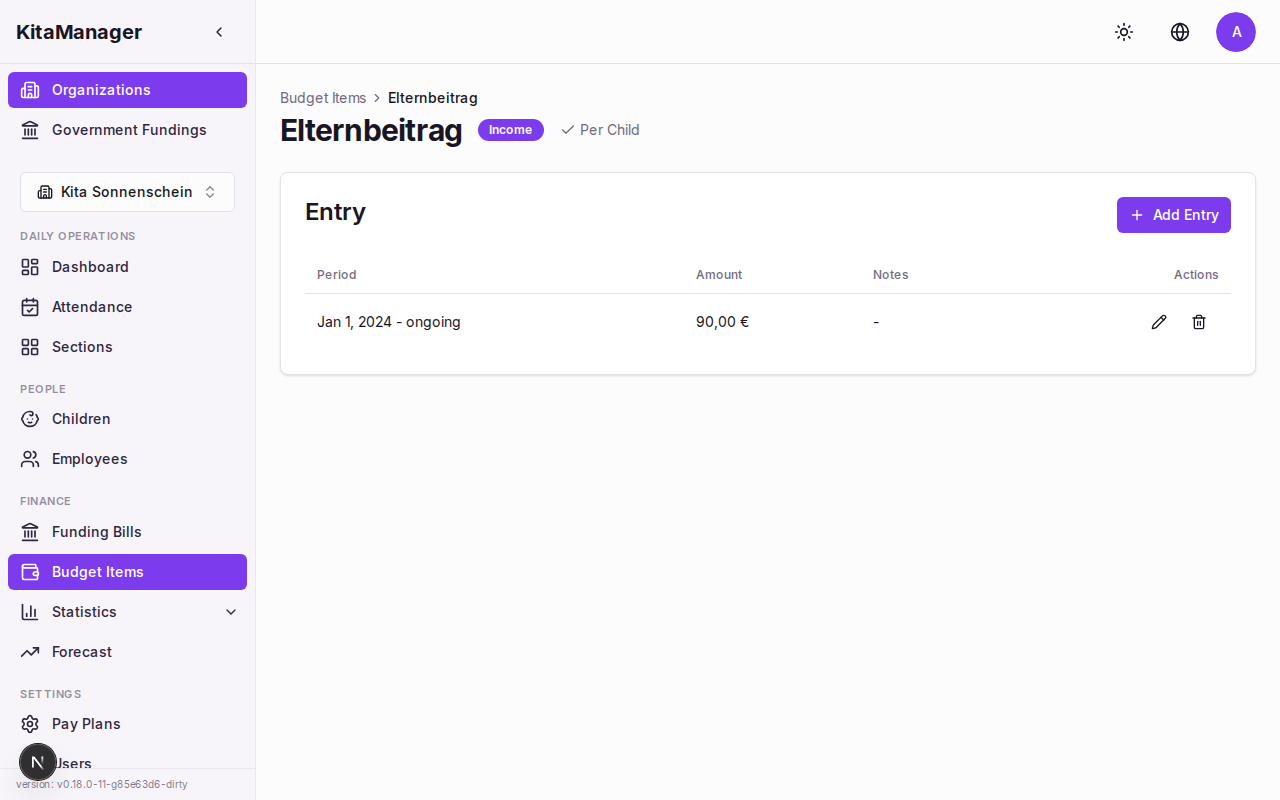
A budget item with its individual entries and date ranges.
Reports and Statistics
KitaManager provides several reports to help you understand your organization’s data and prepare for meetings, audits, or planning sessions.
Statistics Hub
- Click Statistics in the sidebar.
- You will see the statistics hub with links to all available reports.
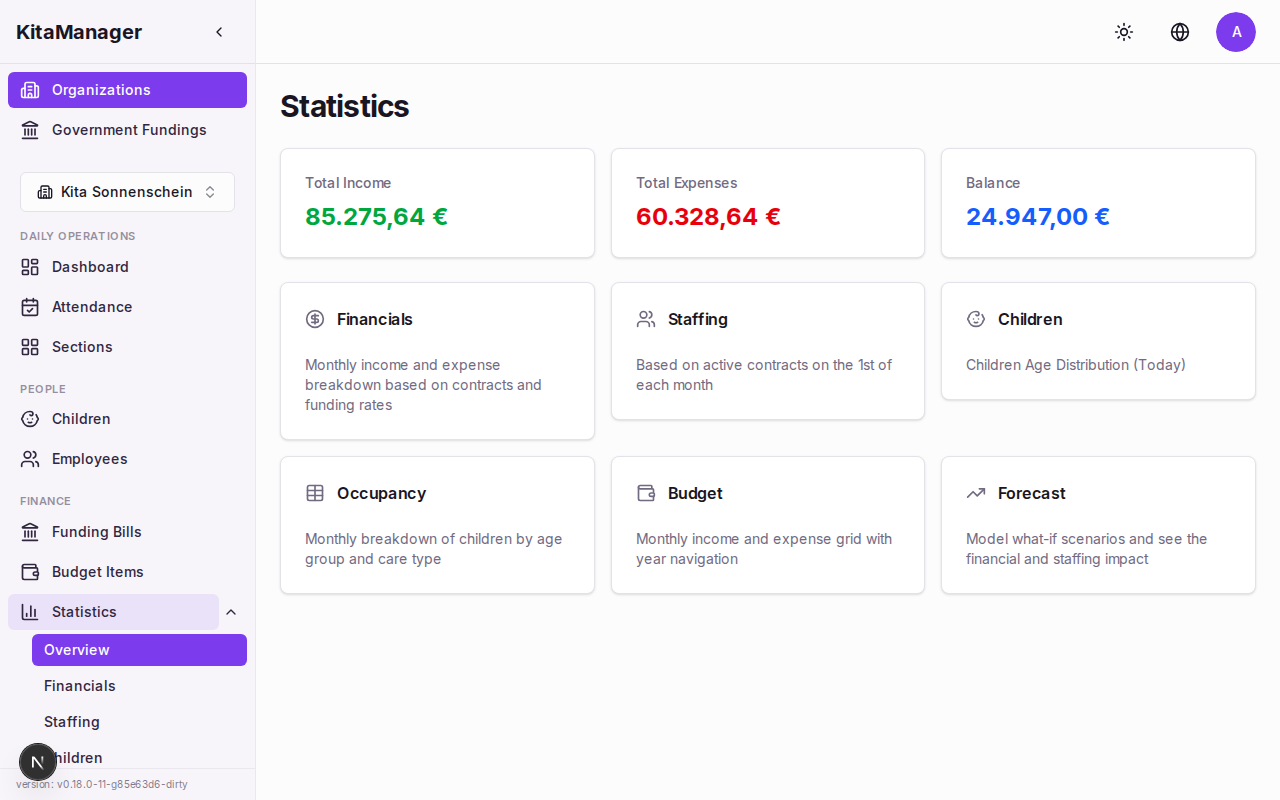
The statistics hub with links to all reports.
Staffing Hours
The staffing report shows whether you have enough staff to meet the required care ratios:
- Required hours – How many staff hours are needed based on the number and age of enrolled children.
- Available hours – How many staff hours you actually have based on employee contracts.
- Balance percentage – Whether you are over- or under-staffed.
This report is essential for maintaining compliance with staffing regulations and for planning new hires.
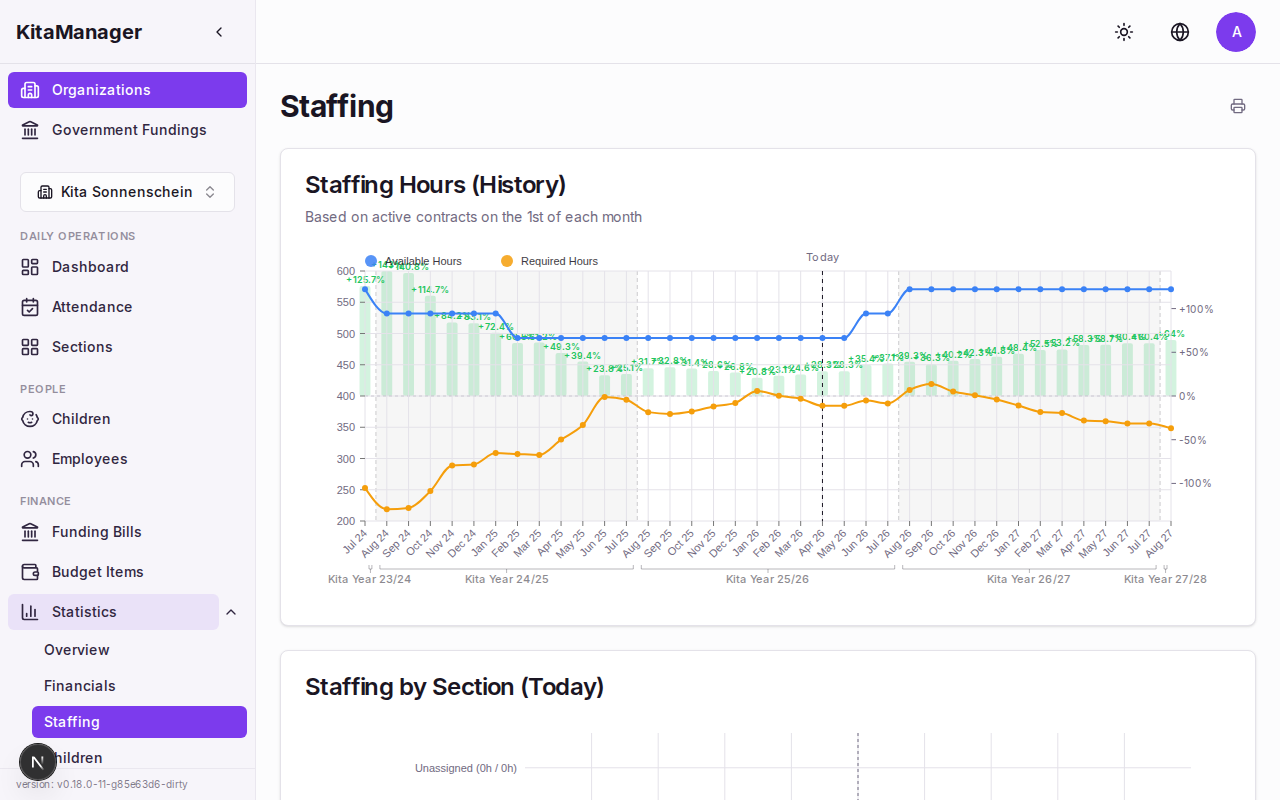
Required vs. available staffing hours with balance percentage.
Children Statistics
This report gives you insight into the children enrolled at your daycare:
- Age distribution – How many children fall into each age group.
- Contract properties – The distribution of care types and supplements across all children.
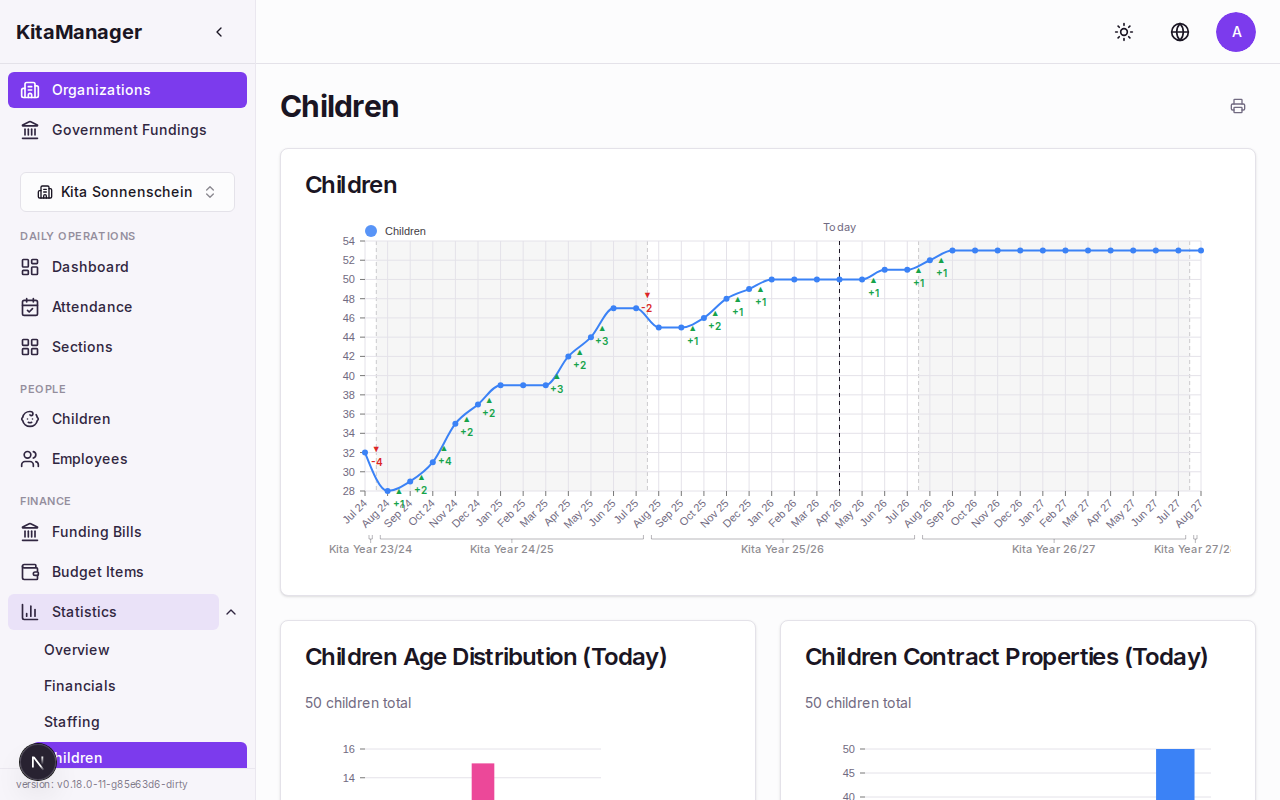
Children statistics showing age distribution and contract properties.
Occupancy Matrix
The occupancy matrix shows a monthly breakdown of how many children are enrolled, organized by age group and care type. Use this to understand capacity utilization and plan for seasonal changes.
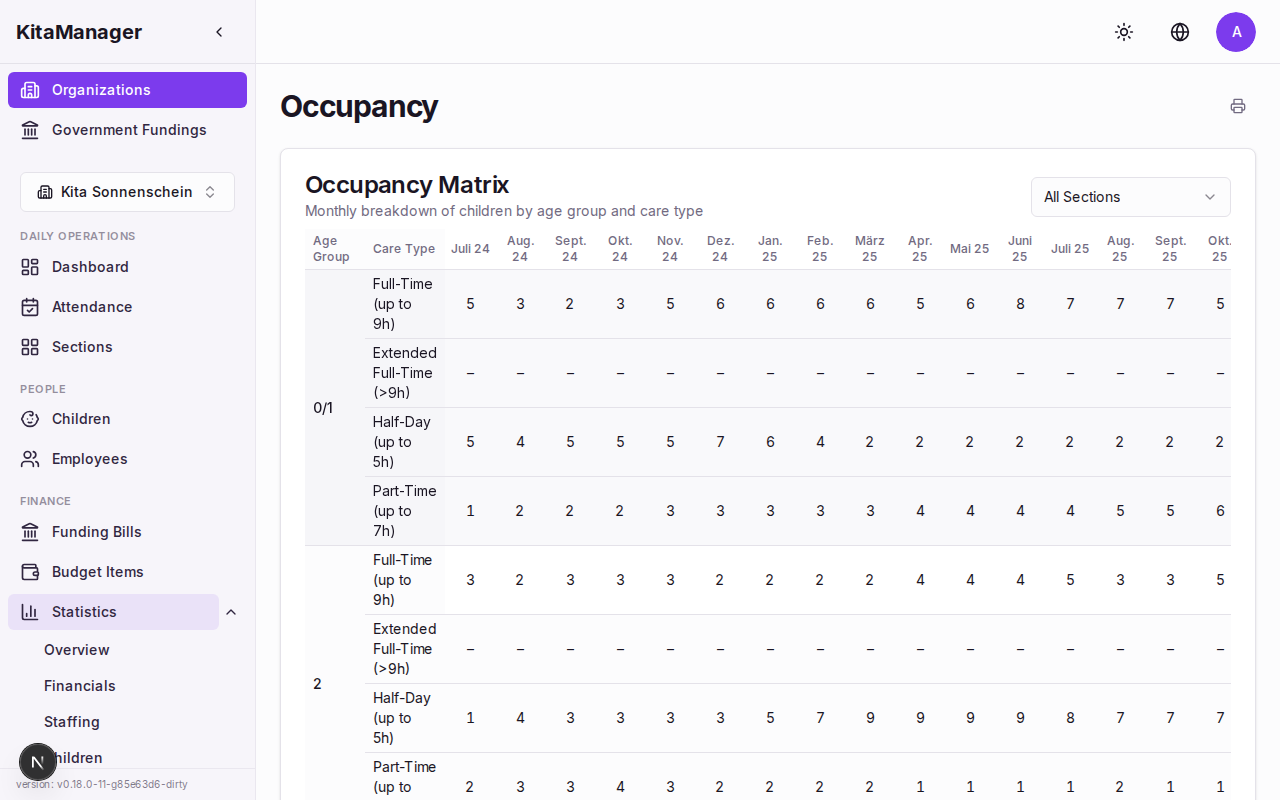
Monthly occupancy breakdown by age group and care type.
Printing Reports
To print any report:
- Navigate to the report you want to print.
- Click the Print button.
- Your browser’s print dialog will open. From there you can print to paper or save as a PDF.
Settings and Configuration
Pay Plans
KitaManager uses pay plans (Entgelttabellen) to calculate employee salaries. The most common pay plan for daycare staff in Berlin is the TVoD-SuE scale, which defines salary amounts based on grade (Entgeltgruppe) and step (Stufe).
Pay plans can be imported via YAML files. Your administrator can update the pay plan when new salary tables are published.
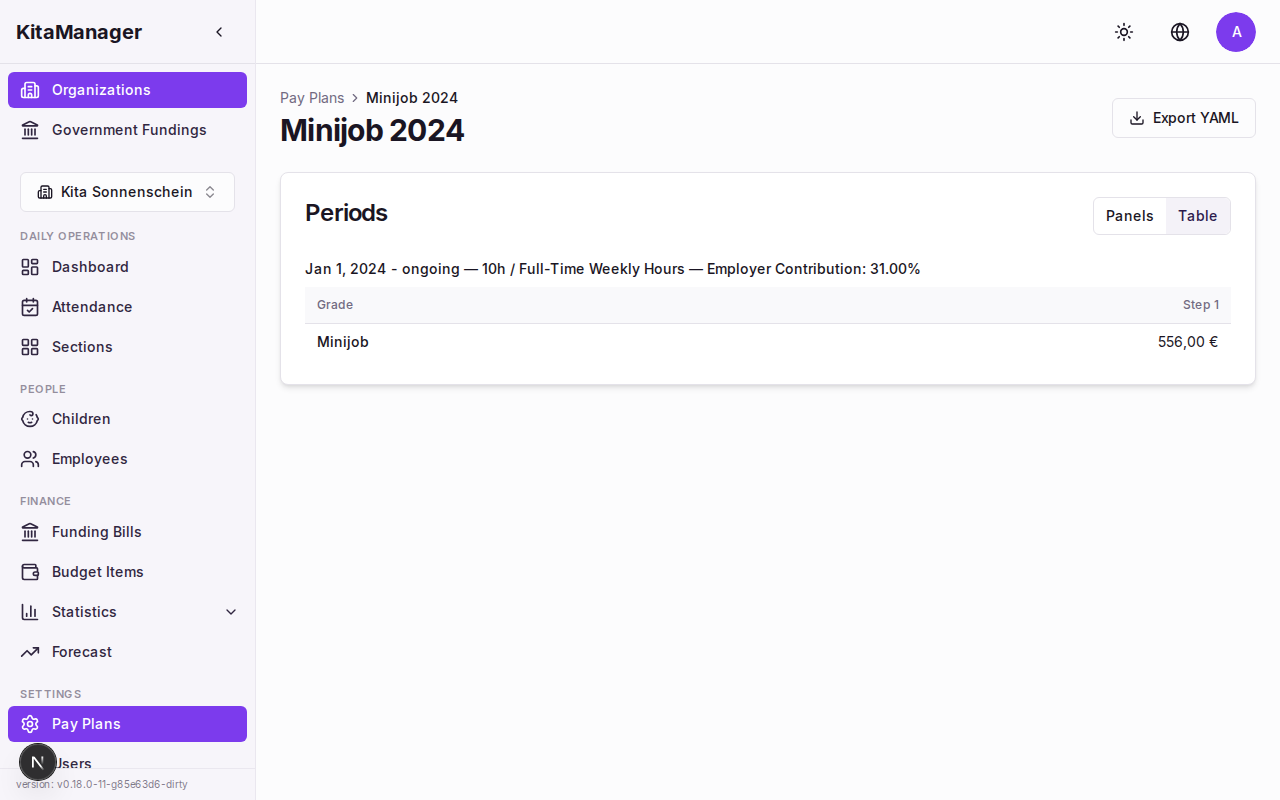
A pay plan showing salary grades, steps, and monthly amounts.
Government Funding Rates
The government funding rates determine how much money you receive per child. These rates are set by the Berlin Senate and change periodically.
- Click Government Funding Rates in the sidebar.
- You will see the current rates organized by age group, care type, and supplements.
Your administrator can update these rates when new ones are published. Keeping them current is critical – outdated rates will cause mismatches when you compare against ISBJ bills.
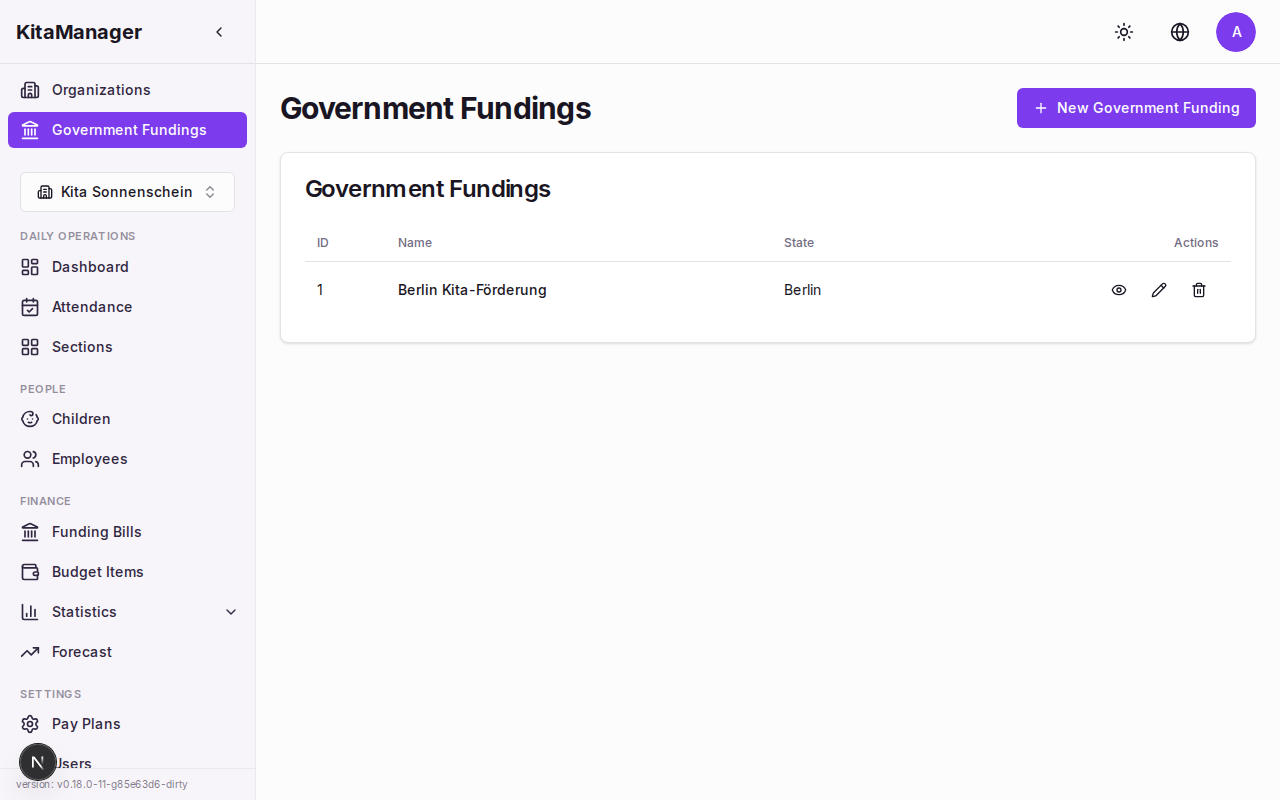
Government funding rates organized by age group and care type.
Click on a funding configuration to see the detailed rates with periods, age ranges, and payment amounts per property.

Detailed funding rates showing payment amounts per age range and care type.
User Management
KitaManager has three user roles with different levels of access:
- Superadmin – Full access to everything across all organizations. This is for technical administrators.
- Admin – Full access within their assigned organization(s). This is for daycare directors.
- Manager – Operational access to employees, children, contracts, and attendance. This is for educators and office staff.
Only superadmins and admins can manage user accounts. If you need a new account for a colleague, ask your administrator.
Importing and Exporting Data
Importing Data
You can import data from YAML files to quickly set up or update your organization. This is especially useful when first getting started or when bulk changes are needed.
- Navigate to the relevant page (Children, Employees, or the applicable settings page).
- Click Import.
- Select the YAML file from your computer.
- Review and confirm the import.
The following data types can be imported:
| Data Type | Format |
|---|---|
| Children | YAML |
| Employees | YAML |
| Pay plans | YAML |
| Government funding rates | YAML |
Exporting Data
You can export data for backups, audits, or use in spreadsheet applications.
- Navigate to the relevant page (Children, Employees, or Pay Plans).
- Click Export.
- Select the desired format.
The following export formats are available:
| Data Type | Formats |
|---|---|
| Children | Excel, YAML |
| Employees | Excel, YAML |
| Pay plans | YAML |
Exported Excel files can be opened in Microsoft Excel, LibreOffice Calc, or Google Sheets.